
uhh.. da brpa punya lama ad blog.. ni la bru nak wat tutorial.. hihi..
tu pun thanks to my buddy SAFFRENSICK yang still sudi baca my blog.. oh.. terharu! :D And he ask me how to edit pic like the one dat I tgh cekak pinggang dlm my 2nd previous post..
and this is how it goes... :)
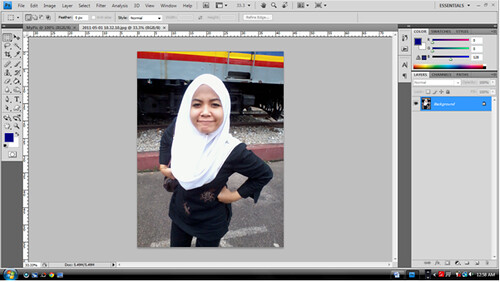
1. Open the picture yang kte nak edit tu.. :D mcm biasa lah.. (File>Open>Browse for your picture).. nah.. amik kau.. kuar la pic kau kat working space photoshop neh.. hihi..
tu pun thanks to my buddy SAFFRENSICK yang still sudi baca my blog.. oh.. terharu! :D And he ask me how to edit pic like the one dat I tgh cekak pinggang dlm my 2nd previous post..
and this is how it goes... :)
1. Open the picture yang kte nak edit tu.. :D mcm biasa lah.. (File>Open>Browse for your picture).. nah.. amik kau.. kuar la pic kau kat working space photoshop neh.. hihi..
2. After that nak kna la touch up sket kan pic tu.. ikut suka ati korg la nak wat cm ne.. but 4 this pic, I want to crop it a bit.. utk dapatkan angle yg lebih menarik la kan.. :D (dlm bulatan merah tu is the crop tool)
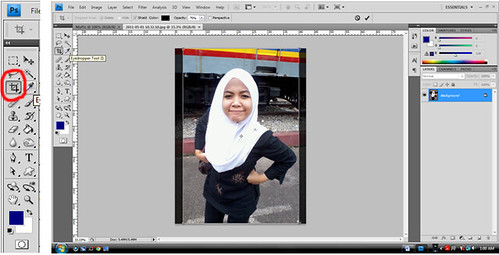
Okey, done cropping.. gambar pun da jadik kecik sket kan :)
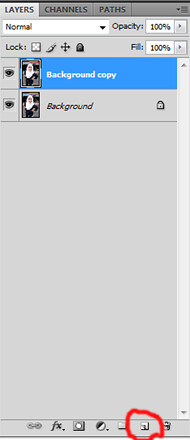
3. mm.. then, we need to create a copy of our image tadi. Juz click on the background layer, and drag kat symbol ‘copy layer’ tu. a default name akan diberi pada background tu which is ‘Background copy’. (simbol 'copy layer' tu I da bulatkan kat pic bawah neh..)
4. Okay, skrg nak start with levels the colours. Click on the ‘Background copy’ layer tadi, and simply tekan Ctrl+L kat keyboard. It’s the shortcut utk dapatkan window Levels kat bawah neh..
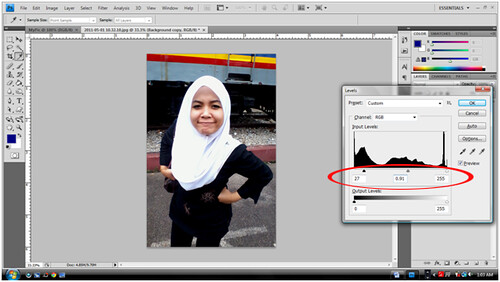
5. Can u see 3 segitiga kat bawah Input Levels part tu.. can u see? Ok, I da bulatkan area tu utk u.. Ha.. adjust this part and u will see ur picture tu akan jadi lagi cantik warna dia.. gerak2 kan segitiga2 tu kay to have more understanding on their function.
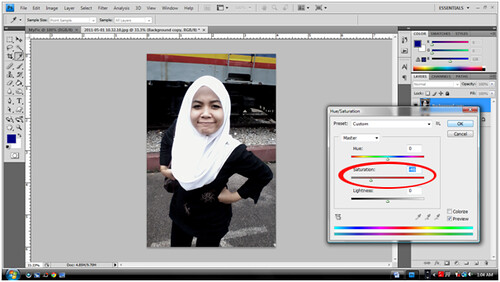
6. Okay… here is the important part. The Hue/Saturation marvellous function in photoshop.. I love this tools.. :D How can u get the Hue/Saturation window ni? Ha, go to Image>Adjusment>Hue/Saturation. Then, adjust the segitiga under Saturation part. Lower the saturation and u will see the effects. :D The lowest saturation would make your picture turns black and white.. magic kan? hihi
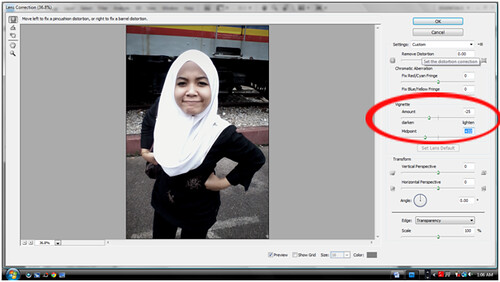
7. To have more effects, u can go to Filter>Distort>Lens Correction. Adjust the Vignette part. This will add the black shadow sekeliling picture kita. :D nice.. see the difference? Okay.. Da siap! yay!!
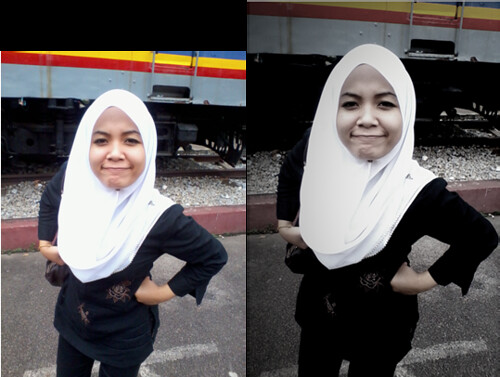
On the left is the original pictures. And on the right is the result.. Ready to be uploaded.. hihi
Yang penting dlm tutorial ni:
1.Levels
2.Hue/Saturation
3.Adding Vignette
Tiga2 effects ni korg leh apply kat mna2 picture je.. Happy Trying! :)
Post a Comment